Sounds a bit swanky doesn't it? I've never owned a chair that you only sit in every now and then. It makes me laugh even thinking about the idea of it.
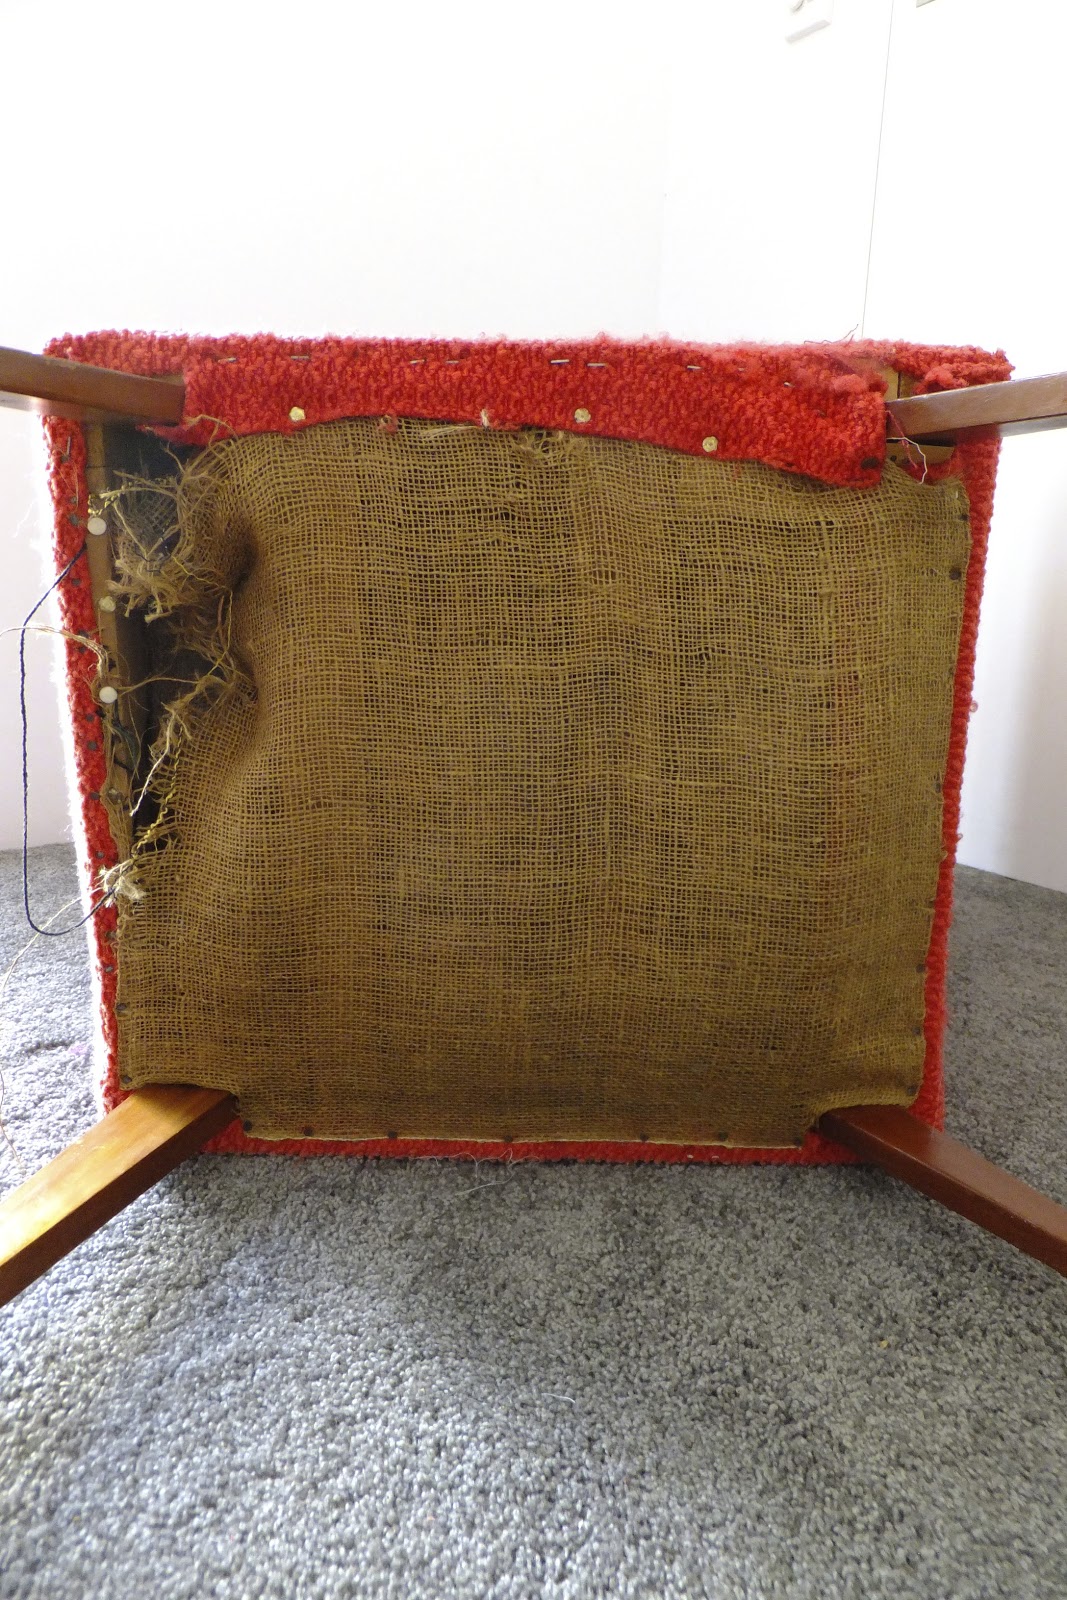
This 50's chair was a bargain secondhand purchase for $20, which became not-so bargainish when it was found to have a loose chair back, a wobbly leg and an unmistakable buttock-shaped indent in the seat *shudder*.
Nevertheless, I love the shape and style of the chair and the buttons, but the fabric is very careworn and faded, and the underside has seen better days:
Fingers crossed that I don't wreck the chair even more. My plan is to replace the wadding and reupholster the chair, and stain its legs. Then it will reside in my bedroom and wait to be sat on. Occasionally.
Sunday, 17 February 2013
Thursday, 14 February 2013
Crochet heart garland
We don't celebrate Valentine's Day here, my husband thinks it is too commercial. Every now and then, he surprises me with a romantic gesture, so it's not all doom and gloom.
So, it falls to me to mark this day in some way. Obviously, what I have created is not a John Cusack boombox moment. Clearly, this is so much better. I made some crochet hearts and strung them together to make a little garland. I planned to make a whole bunch of hearts in different sizes and patterns and festoon the handrail upstairs with them but I settled on five because I thought it would be a nice symbolic representation of the great loves in my life; my husband, my children, my family, my friends and Whittakers Dark Chocolate. Ha! Who am I kidding? I just got sick of making them so that's how many ended up on the string. You might say I was feeling a little half-hearted. I know, I'm hilarious.
Time taken: 1 hour
Degree of difficulty: Easy
Result: Upon seeing my handiwork, my husband shook his head and I even detected a slight cringe. That just made me want to display them in full view on our wedding photo frame even more. Happy Valentine's Day to all the romantics out there.
So, it falls to me to mark this day in some way. Obviously, what I have created is not a John Cusack boombox moment. Clearly, this is so much better. I made some crochet hearts and strung them together to make a little garland. I planned to make a whole bunch of hearts in different sizes and patterns and festoon the handrail upstairs with them but I settled on five because I thought it would be a nice symbolic representation of the great loves in my life; my husband, my children, my family, my friends and Whittakers Dark Chocolate. Ha! Who am I kidding? I just got sick of making them so that's how many ended up on the string. You might say I was feeling a little half-hearted. I know, I'm hilarious.
Time taken: 1 hour
Degree of difficulty: Easy
Result: Upon seeing my handiwork, my husband shook his head and I even detected a slight cringe. That just made me want to display them in full view on our wedding photo frame even more. Happy Valentine's Day to all the romantics out there.
Sunday, 10 February 2013
Pleated skirt
Ever wondered what to do with all those annoying thin lengths of fabric in your stash that seem too big to throw out but are never quite large enough for any big sewing project? You make a girl's skirt with them, that's what you do. Yes.
When I uncovered a long since forgotten narrow piece of khaki twill and some smaller offcuts in my stash today, a plan was hatched to make a pleated skirt for Aimee. I used this pleated skirt tutorial as a guide, but I had to make a few allowances here and there as I was using smaller pieces than the tutorial suggested, plus I wanted to have a larger waistband which meant I had to sew some strips together from my scraps. It took me the whole afternoon to work it all out.
Degree of difficulty: Fairly straightforward - always helps if there's a tutorial to guide you
When I uncovered a long since forgotten narrow piece of khaki twill and some smaller offcuts in my stash today, a plan was hatched to make a pleated skirt for Aimee. I used this pleated skirt tutorial as a guide, but I had to make a few allowances here and there as I was using smaller pieces than the tutorial suggested, plus I wanted to have a larger waistband which meant I had to sew some strips together from my scraps. It took me the whole afternoon to work it all out.
Aside from the waistband, the other main differences to the tutorial are that my version has fewer pleats and a single button closure. To add some length to the skirt, I paired the twill with the floral cotton left over from Renee's dress. The button on the waistband is covered with the same fabric. I love how it turned out.
I've just worked out how to add a button when linking to other people's blogs, I'm pretty excited about that. So, even though it's Sunday here, I'm joining in (I hope she won't mind):
Degree of difficulty: Fairly straightforward - always helps if there's a tutorial to guide you
Time taken: 4 hours
Result: Cute and carefree. Next time, I would reinforce the buttonhole, I can see that's going to be the Achilles heel of this little skirt.
Saturday, 9 February 2013
And the winner is...
Well my lovelies who entered my charm square giveaway, you had a 25% chance of winning, and the random number generator selected comment number 1:
so congratulations...
...you are the proud owner of 40 random squares of fabric. Hope you've got big plans for those ladybirds. They are all packaged and ready to go, please get in touch through my blog to let me know how I can get them to you.
Thank you to everyone else for playing along. Hope your weekend is going FABulously well.
Thursday, 7 February 2013
Restyled 50's dress
Remember the vintage floral fabric I acquired? Here is how it looked made into a dress back in the late 50s. My mother made this outfit herself at the age of 14. I don't know about you, but at 14 I'm pretty sure I wasn't sitting at a sewing machine making my own clothes. Such wasted opportunities - and something I plan to address (did you get the pun - heehee) with my own girls.
When she decided she no longer wanted to wear the dress, mum pulled it apart and saved the material from the full skirt. There was roughly two metres of fabric, more than enough to make a swing dress for Renee.
Despite her expression, she truly does love the dress. Something stung her on her upper leg just before I took this photo. I captured the moment she realised she had been stung:
Poor girl, our photo shoot was very short-lived.
Inspired by the mini Boden dress below (isn't it adorbs?), I drafted a pattern and made up a test dress using an old sheet. The first attempt was a bit snug and the neckhole was too tight so I'm glad I took that step instead of cutting straight into the fabric.
Tackling the panel and facing on the front of the dress was the hardest part. I made two attempts at it and I am still not entirely happy with it, but since I have no fabric left to have another go, it shall remain like it is until it falls apart. There is probably an easier way of making a facing with a neckline shape like this, but I ended up making a full facing that is in a 'y' shape to neaten the panel from the reverse side.
The most enjoyable part of constructing this dress was stitching a diamond pattern on the front panel.
I don't know about you but one thing I cannot do on a sewing machine is a blind hem stitch. Somehow, I miss stitches completely in places and have huge stitches on the outside of the garment in others and, to me, it just looks so messy with all those v-stitches on the reverse of the fabric. I usually just topstitch my hems to avoid this issue altogether, but for this dress, I ended up hand sewing the hem and front facings.
The dress has deep hidden pockets, good hidey holes for Renee's little treasures and she thinks they are the best part of the dress - although for a child who has been known to be a little light-fingered at times, I'm not sure I thought that one through...
The dress is a little on the big side, but at least this way, she will get a couple of years' wear out of it.
Degree of difficulty: Inserting the panel into the neckline at the front of the dress and the facing was hard, the rest of the dress was easy
Time taken: 2 days
Result: Renee loves her new dress and wants to wear it to school while her mother will spend the whole day praying it won't fall apart in the playground.
When she decided she no longer wanted to wear the dress, mum pulled it apart and saved the material from the full skirt. There was roughly two metres of fabric, more than enough to make a swing dress for Renee.
![]() |
| What the....?? |
Inspired by the mini Boden dress below (isn't it adorbs?), I drafted a pattern and made up a test dress using an old sheet. The first attempt was a bit snug and the neckhole was too tight so I'm glad I took that step instead of cutting straight into the fabric.
Tackling the panel and facing on the front of the dress was the hardest part. I made two attempts at it and I am still not entirely happy with it, but since I have no fabric left to have another go, it shall remain like it is until it falls apart. There is probably an easier way of making a facing with a neckline shape like this, but I ended up making a full facing that is in a 'y' shape to neaten the panel from the reverse side.
The most enjoyable part of constructing this dress was stitching a diamond pattern on the front panel.
The dress has deep hidden pockets, good hidey holes for Renee's little treasures and she thinks they are the best part of the dress - although for a child who has been known to be a little light-fingered at times, I'm not sure I thought that one through...
The dress is a little on the big side, but at least this way, she will get a couple of years' wear out of it.
Time taken: 2 days
Result: Renee loves her new dress and wants to wear it to school while her mother will spend the whole day praying it won't fall apart in the playground.
Tuesday, 5 February 2013
Sunday, 3 February 2013
FABRuary giveaway
In honour of my husband's significant birthday next week, I have cut 40 charm squares (roughly 13x13cm) from some fabrics in my stash for one lucky reader. Some are slightly undersized, but I am sure you will forgive me for that and for the fraying edges; I need to invest in some pinking shears. Some of these prints are, shall we say, inexpensive, but there are some nice quality ones in there too, and even one or two hard to find Kokka pieces.
You might think I've gone a bit dotty:
Most fabrics are light to mid-weight cottons:
As you know, we are heavy on the girl prints in this household:
But there are some boy prints thrown in too:
So, hopefully there is something in there for everyone. Are you excited??
All you need to do is leave a comment telling me which is your favourite charm square bundle (I'm just curious). The giveaway is open to New Zealand-based members of my blog only (I am sorry about that, my international lovelies). I will announce a winner next Saturday.
Subscribe to:
Posts (Atom)